
The Tiertime UP mini 2 is our fall 2018 pick for the "Best 3D Printer for Beginners". Check out our review to find out why it is the ideal starter machine.
he first time we tried using the UP mini 2 3D printer, a fused deposition modeling (FDM) machine, things did not go according to plan.
We followed the touch-screen controls and ran through the initialization stages, then we auto-leveled the bed and initiated printing a test model. What happened next? The hot-end ripped into the print bed.
Fortunately, things did improve considerably after this initial setback. We’ll explain why further in this review.
And it’s true to say, broadly speaking, that our expectations were met. The UP mini 2 3D printer is indeed very easy to use. It’s got a budget price tag, but can still produce decent printed objects. And the safety features are highly desirable, especially if you need to print with ABS filament.
Pros
- Simple Operation
- HEPA Filter
- Separate Filament Caddy
- Swappable Print Beds
- Blackout Recovery
- Great Price
- Touchscreen Controls
- Auto-Bed Leveling
- Optimal Setup for ABS
- Printing
- Quiet Operation

Cons
- Spotty Build Quality
- Wifi Connectivity Didn’t Work
- Inadequate Documentation
- Basic Slicing Software
- Limited Build Volume
- No SD Card Slot
- Filament Caddy is NonExpandable

Verdict
The UP mini 2 3D printer most certainly has its fair share of quirks, but we would give it a strong recommendation. Why? Because it has a unique set of advantages that stand over and above any other printer at this price point.
Firstly, the HEPA filter is an integral part of the design, and it’s absolutely superb. Nasty toxic fumes and particles are dramatically reduced, to the point where it’s comfortable to use this printer at your desk.
In addition to the filter, the UP mini 2 3D printer goes some way to redeeming ABS as a material for daily use. After dealing with the issue of odors, the enclosed build chamber and perforated print bed gives you consistent and reliable results when printing.
Thirdly, the separate filament caddy is a very nice addition. Without being exposed to the air, your precious filament is preserved and protected from prematurely spoiling. This is also a factor for consistent results.
The problems we encountered were chiefly to do with confusing documentation and software. And some users will feel constrained by the tiny build volume and the closed hardware and software.
But in the broader picture, the UP mini 2 3D printer is a great little machine with an innovative approach to health and safety, which in turn leads to better end results.
We would hope that more hardware manufacturers took note of the UP mini 2 3D printer; make these safety technologies more widely available, please!

The Looooong Read
As the name implies, the UP mini 2 3D printer is the successor to another product called the UP Mini. The new and improved unit is manufactured by Beijing Tiertime Technology, one of the biggest players in the 3D printing industry in Asia.
It’s worth noting that Tiertime has many fingers in many pies, so to speak. In addition to a growing range of desktop 3D printers (the UP family), they also manufacture industrial 3D printers (the INSPIRE range), develop dedicated software for both lines, and produce ABS and PLA filament for the consumer range.
Effectively, the company has developed a complete end-to-end ecosystem. This is something of a closed loop, but there are a few concessions to open accessibility; the UP mini 2 3D printer accepts third-party filaments, can print with the STL file format, and it accepts a handful of spare components which can be digitally fabricated.

Design
The UP mini 2 3D printer is a compact desktop device that sits in the fused filament fabrication category. It pushes molten thermoplastic filament through a heated nozzle, and builds a solid object by depositing one thin layer of plastic after the other.
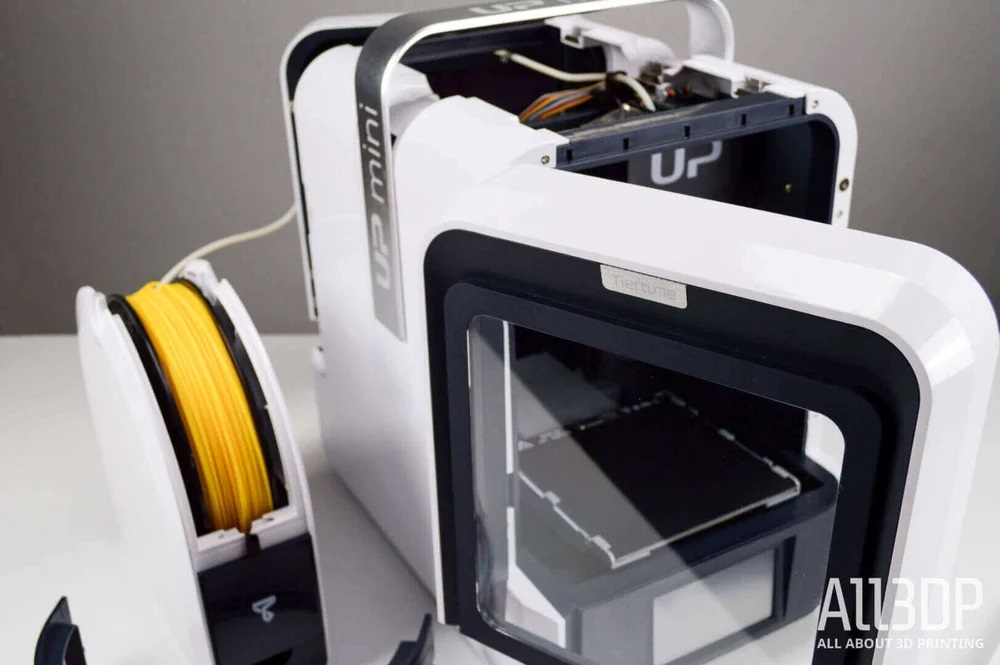
The design is a Cartesian frame, with black powder-coated metal inside a plastic enclosure, with 3D printed components and linear rails. The tool head moves on the Y axis and the print bed moves on the Z and X axis.
For the print head, this is a direct drive design. The filament extrusion and hot end is handled within a single unit, and the filament is fed into the back via a standalone filament caddy. The UP mini 2 3D printer is a single extrusion machine, which means it can print with only one spool of filament at a time.
Located beneath the bed is the signature asset of the printer, a High Efficiency Particulate Air (HEPA) filter. Filters meeting the HEPA standard have many applications, including use in hospitals, automobiles, aircraft and homes. What it does is remove (from the air that passes through the filter) 99.97% of particles that have a size of 0.3 µm.
To learn more about particle emissions from FDM 3D printing, check out the independent research of the Built Environment Research Group. They’ve tested a range of machines — but not yet the UP mini 2 3D printer — and are continually updating their list.
One question mark about the design of the UP mini 2 3D printer concerns access to parts. While there are magnetic doors on the front and back, and removable panels from the top, we’re wondering how easy it will be to change the HEPA filter at a later stage. Or even do something as simple as clean out waste filament from the base of the machine.
Another question is build quality. The doors are a bit loose on their hinges, and have a tendency to bump against the frame when closing. Also, raising the handle on the roof of the unit reveals a pair of openings for odors to escape through, potentially impacting the efficiency of the HEPA filter.
Features
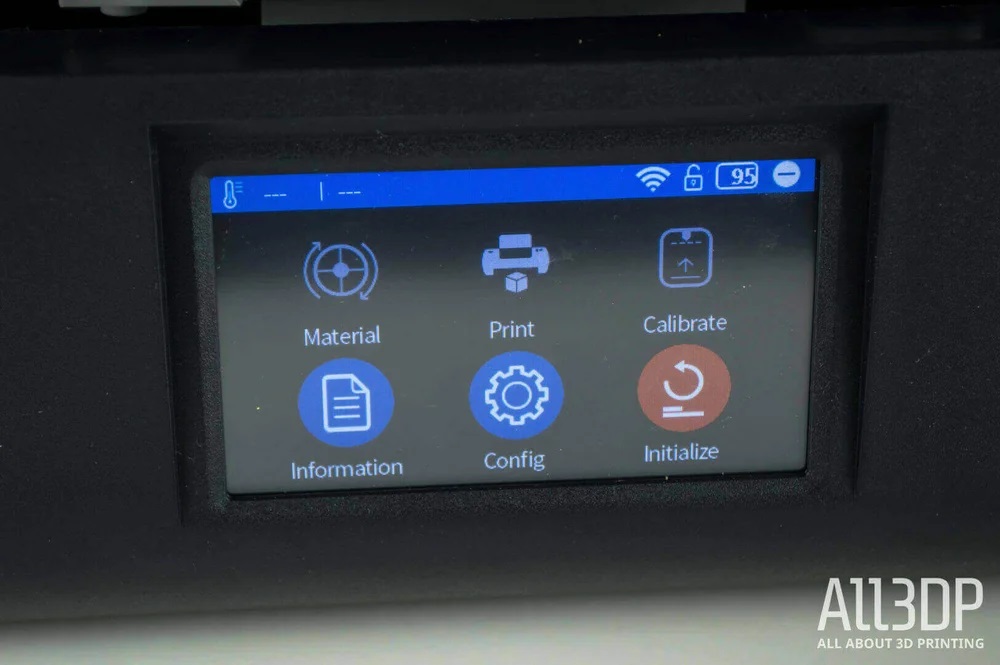
The UP mini 2 3D printer has a touchscreen control panel on the front, where you can access most of the features of the unit. These include configuration settings, initialization, calibration, and (of course) printing.
Those specs in full:
Heated build plates, with interchangeable perforated build plate or UP Flex print board.
Print area of 120 x 120 x 120mm (4.7 x 4.7 x 4.7 in)
Layer thickness of 0.15/0.20/0.25/0.30/0.35mm
Standard usable filament sizes of 1.75mm
Platform leveling with automatic nozzle height detection
Blackout recovery, to stop and resume printing in the event of a power failure.
Intriguingly, while the marketing material says otherwise, we wouldn’t classify the UP mini 2 3D printer as being capable of standalone operation.
There’s no SD card slot, for starters, so direct uploading of STL files is not possible. Instead, you’re encouraged to connect the unit to your WiFi network, or directly tether it to your PC via USB. From there, the printer is managed using Tiertime’s dedicated UP Studio software.

Setup
To set up the UP mini 2 3D printer, the first thing you need to is attach the print head and power ribbon. This is actually pretty simple, where the head is held in place using magnets. There’s a slight irritation in that the carry handle is positioned directly above the head and obstructs access.
Second stage is to switch it on, initialize the unit, then install and auto-level the print bed. Once that’s ready, you load the filament caddy, feed the strand through to the print head, and follow the instructions on the touch-screen interface.
The third setup stage is to connect the UP mini 2 3D printer to your local network. We should mention that for this review, whether it was a software or hardware failure, the machine simply wouldn’t connect to our WiFi network. We had to resort to direct PC tethering instead.
So what happened to us when we fired up the UP mini 2 3D printer for the first time? Near as we can make out, the problem came down to the interchangeable print beds.
The printer comes with a set of four beds; two for printing with normal filaments, two for printing with flexible materials. They slide in and out with relative ease. The setup documentation, meanwhile, doesn’t specify *which* bed to insert for the first time.
When we fired up the test model for printing, which is optimized for a cube in ABS, we didn’t have the appropriate bed in place. In effect, the flexible bed got trashed.
Fair warning, folks. Be sure to check which print bed you’re using before you print anything on this machine.
Filament
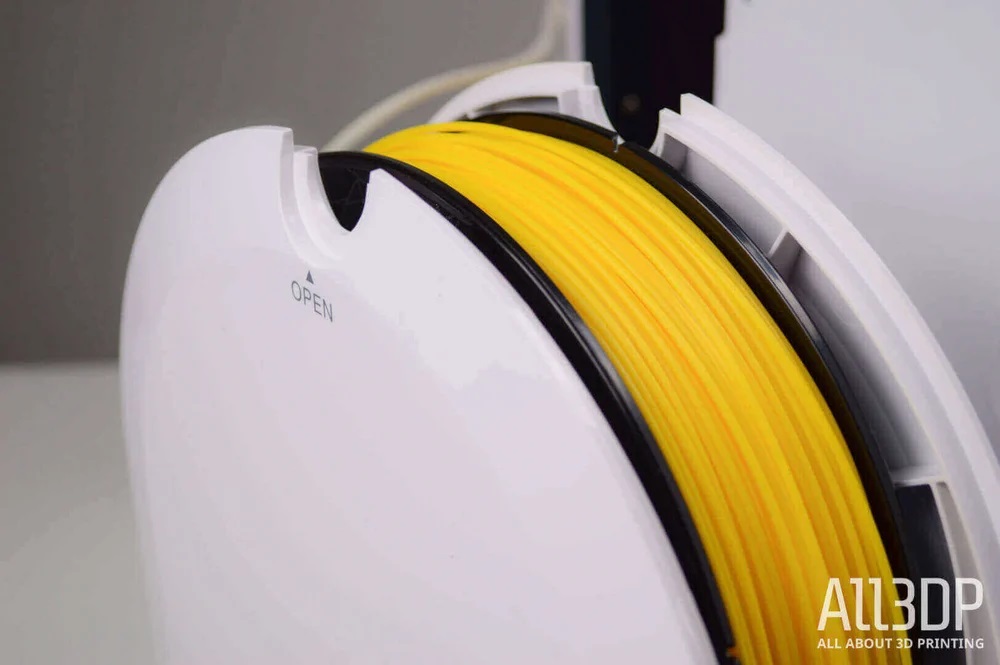
The dedicated filament caddy is not as innovative a feature as the HEPA filter, but it’s certainly worth calling attention to.
Usually when FDM printing, the filament spool is mounted on a holder above or behind the machine. It’s highly unlikely that you will use an entire spool of filament in a single printing job. The standard weight of a spool is 500g, but can also go up to 1kg. With daily use, a single spool can last for weeks or months.
A problem arises when filament is exposed to the open air for long periods. It will naturally spoil by absorbing moisture, and in turn this will impact on the quality and consistency of your final prints. That’s why a spool is typically sold in airtight bags with little packets of silica gel.
The caddy that comes with the UP mini 2 3D printer is a welcome solution for keeping your filament fresher for longer. It’s entirely enclosed, with a little bowden tube feeding the filament into the back of the machine. It’s simple but effective, and the caddy even has a little toolbox drawer in the base. We like!
Unfortunately, spools bigger than 500g are not going to fit in this enclosure. But for most people, it should be more than adequate.
Software
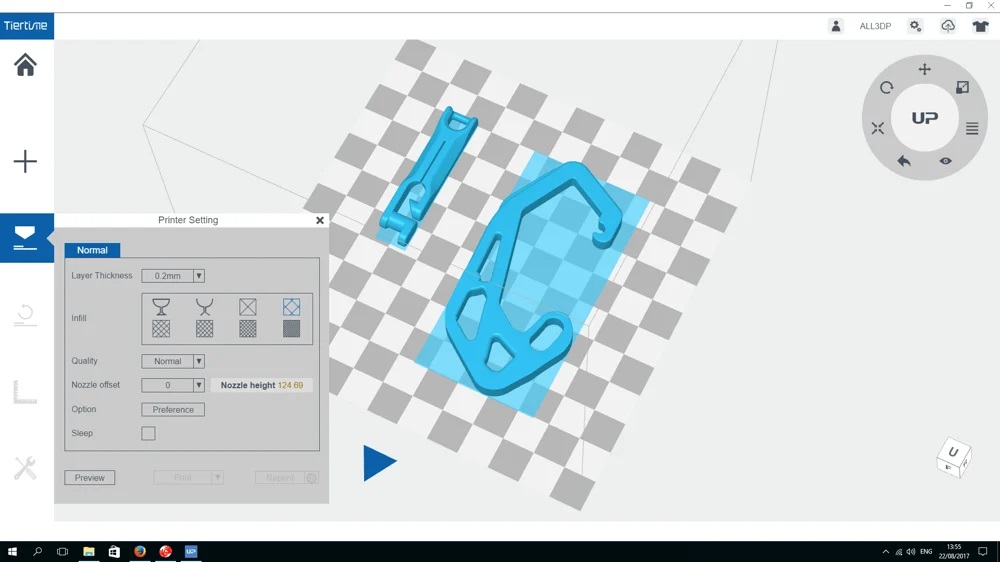
The software interface for the UP Studio, with which we managed the UP mini 2 3D printer, is basic but functional.
The first thing you’ll have to do is create an account and register the printer. Then when it’s “binded” to your PC, you can commence loading up models and printing.
One immediate frustration is that, as a catchall software suite to manage all of Tiertime’s desktop machines, the UP Studio has features that do not apply to the UP mini 2 3D printer. Activating Auto-Calibration of the print bed, for example (a separate process from Auto-Leveling).
Looking past this, however, it’s relatively painless to upload a model, tweak the desired settings, then slice and upload it via USB. It’s not as rich or as intuitive as, say, Cura software, but you can click around for things like scaling and placement without going too far wrong.
The default settings will always want you to print with a raft and supports. Since we’re using ABS filament for this review, and working with a perforated print bed, those really are the optimal settings to work with. But you do have the option to switch them off if you prefer to live dangerously.
There’s also a mystery feature in here for converting a photographic image to an STL file for printing. It’s not really much use for a typical family photo, but might be a fun novelty for topographical maps.
Printing
Don’t Miss:
Ah yes, let’s talk about printing. It’s truly impressive how the UP mini 2 3D printer is optimized for working with ABS filament.
Why is that so important? Because while ABS material has superior mechanical properties to PLA material — it’s stronger and more flexible — it’s notoriously more difficult to print with, and it gives off a toxic stink that’s deeply unpleasant.
By way of comparison, the only other desktop 3D printer on the market that we’d really recommend for working with ABS would be the Zortrax M200. And that’s three times the price (albeit three times the build volume).
But the staggering thing is that Zortrax doesn’t offer the HEPA filter, or the filament caddy, or the emergency power backup. So in the end, you’re offered a choice that’s just as much about clean air and filament storage as it is about cost and build volume.
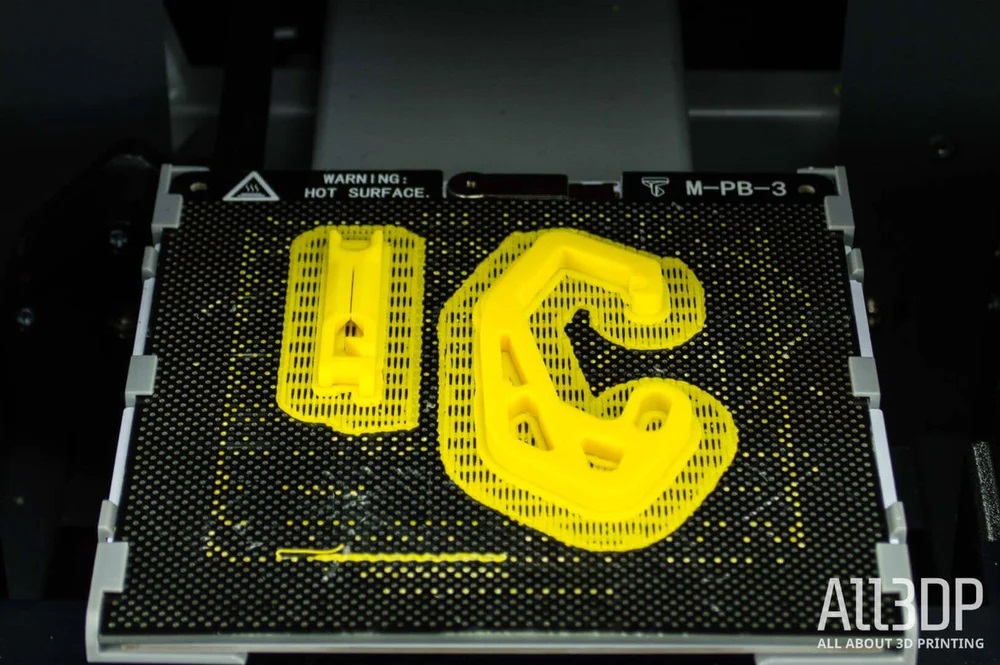
Since the build volume on the UP mini 2 3D printer is rather stingy, we had to get creative with our selection of test models. We set out to demonstrate that you could still print something useful at this size, and not just trinkets and toys.
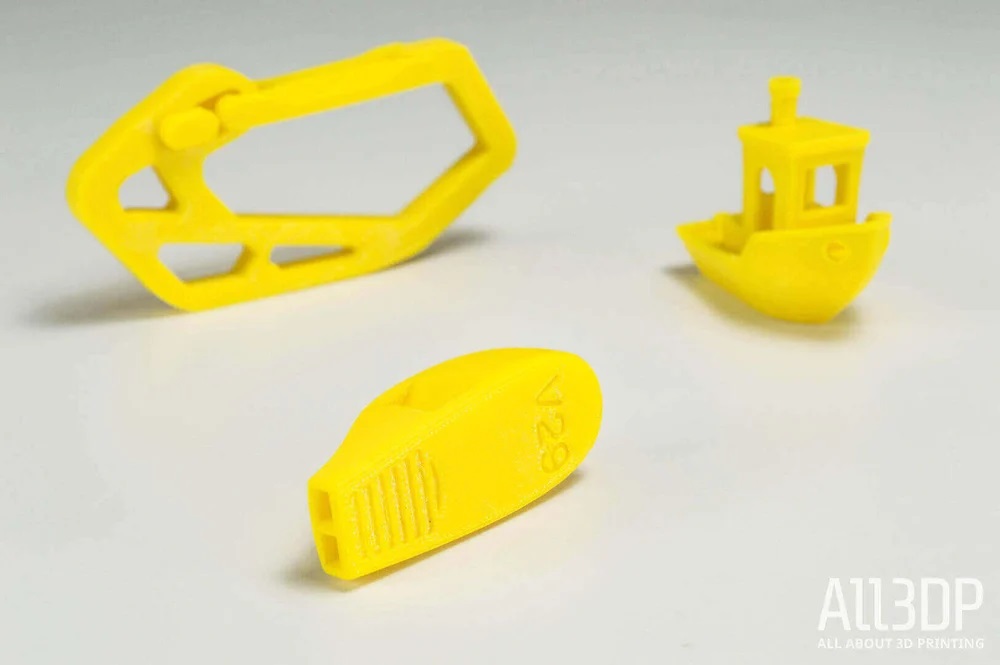
In addition to the standard 3DBenchy, we made a V29 Survival Whistle, a Super Best Bottle Opener, a Stronger Carabiner Frame, a Side Release Buckle, and a Mounting System for Bike Lights. All these STL files are available to download from Thingiverse.
The quality of the printed objects was highly satisfactory. A benefit of printing items at this size is that each job is completed very quickly. Thereafter, you swap out the bed for a clean one, and initiate printing a new job while prying the printed item off the other bed.
Also, the operation of the machine is pretty quiet, so that’s a bonus.

More Printing
Fabricating a 3DBenchy at the highest available resolution of 150 microns and 20% infill resulted in a very clean print with only minor flaws to the prow of the boat.
Printing everything else at 200 microns and 99% infill; the survival whistle couldn’t be printed with support material, since the hollow chamber needs to be clear of obstruction to work. So that was a test of bridging and overhangs which the UP mini 2 3D printer managed pretty well.
The other items were printed flat or sideways on the bed with rafts and supports, and turned out pretty well. The Side Release Buckle was scaled up 150%, and if anything it improved the model by making it stronger and more robust.
One issue we noticed is that overhangs at the earliest layers tended to look a bit scrappy, as though the filament hadn’t bonded properly, so you have to consider the orientation of the object being printed to compensate.
Another issue is those surfaces attached to a raft or support material will not look as polished as surfaces printed without. They can be cleaned up a bit with post-processing, but again, consider the orientation of the object being printed to compensate.
After one test model and five useful things, we’d consider the fabrication capabilities of the UP mini 2 3D printer to be a solid success, but with room for improvement.
A build volume of 150 x 150 x 150mm would really hit the sweet spot, for example. And heating the inside of the enclosure would benefit the quality of the 3D printed objects even further.
Wrapping Up
We do like the UP mini 2 3D printer, but with a set of caveats.
The supporting documentation is pretty lousy. Having things broken out of the box like the much vaunted WiFi connectivity is annoying. And there are features in the software which are just plain baffling.
That, and the build volume is smaller than we would like.
But we can forgive all this because of that amazing little HEPA filter. And the quiet, efficient way it goes about printing things. And having a dedicated filament caddy is a tidy bonus.
All of which means the UP mini 2 3D printer is incredible value for just under $600 dollars. In the current market you can certainly buy a cheaper 3D printer; but you won’t find one that makes health and safety such a key aspect of the value proposition.
TIERTIME UP MINI 2
The Tiertime Up Mini 2 is our pick for the “Best 3D Printer for Beginners of Summer 2018”. Though compact, it offers a number of sophisticated features, like a HEPA air filter and an enclosed build chamber.