
It’s a fantastic feeling when you open the lid of your SprintRay Pro to see a full platform of perfectly-formed parts. But finding that your models are malformed or have fallen into the resin tank can be confusing and frustrating. Recent advances in 3D printing technology have made it easier than ever to achieve success with this powerful tool. But while SprintRay goes to great lengths to ensure you reach your production goals, there are a few external factors that can affect the final success of any print job.
SprintRay’s mission is to help dental clinics and labs grow to meet their production goals. To help you on your way, we put our heads together to help you identify and help avoid 3D printing problems. Whether this is your first 3D printing experience or you’re a veteran of the first affordable desktop FDM models, we hope that this guide helps you unlock the incredible potential of in-office dental 3D printing.
Follow Best Practices for Preparation and Design
The preparation and design phase encompasses three major activities: capturing patient data, using that data to design an appliance, and importing that file into RayWare for print nesting. Mistakes made during this first phase can have wide-reaching effects. Inconsistencies in scan data, CAD design problems, and improper print setup can all lead to problems if not corrected.
1. Ensure Consistent Scanned Data
Intraoral scanners are a fantastic piece of technology, enabling dental professionals to digitally capture patient data without the problems associated with traditional impressions. But even small imperfections or gaps in scan data can have adverse consequences on the quality of your final print, as the scanned data is the blueprint for every part of the process going forward, including 3D printing.

When scanning, ensure that all data is complete and there are no visible holes. Pay close attention to the rendering of the patient’s dentition to ensure that the digital scan matches up with reality. Once the scan is complete, take a detailed look at the 3D file. Rescan any areas that appear to be missing data to maximize success downstream in the process.
2. Ace the Model Design
If you’re using dental CAD software such as 3Shape or Exocad, ensure that your models are fully closed and watertight before exporting them to your printer. RayWare uses machine learning to check your models for holes and non-manifold surfaces. If you receive a warning from RayWare, double-check your model before printing to verify that there are no issues. Additionally, ensure that you are designing your appliances correctly for your printer – different printers can have different requirements for settings such as offset, retention, and tolerance. Proceed with these desired settings in mind.

If you outsource the design of your appliance to a lab or other 3rd party, make sure to communicate to them which printer you’ll be using for fabrication. Despite their expertise, labs and design services may occasionally provide you with models that have printability issues. If you receive errors in RayWare or notice any black holes on the surface of your model, ask them to double-check their work. For help verifying if your 3D model has printability problems, reach out to SprintRay Support.
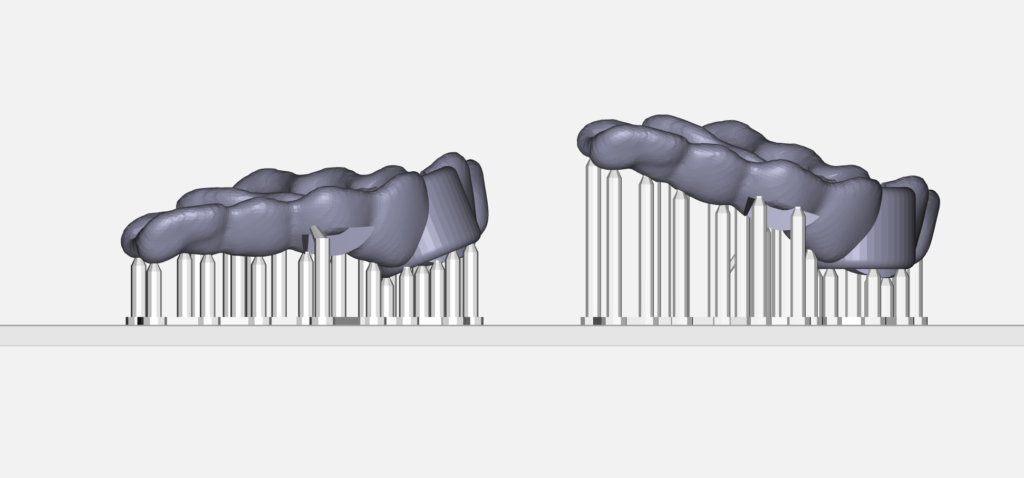
3. Nail the Nesting Phase
There are two major, related considerations when orienting your models for printing: support structures and orientation. If you are printing models that have a large, perfectly flat base, such as models for clear aligners or waxups, then printing the models flat against the platform is the most rapid way to proceed. This method will provide the highest print speeds and require the least post-processing, as there are no support structures to contend with. However, printing flat against the platform is only possible when your model has a perfectly flat base and is free of major overhangs.
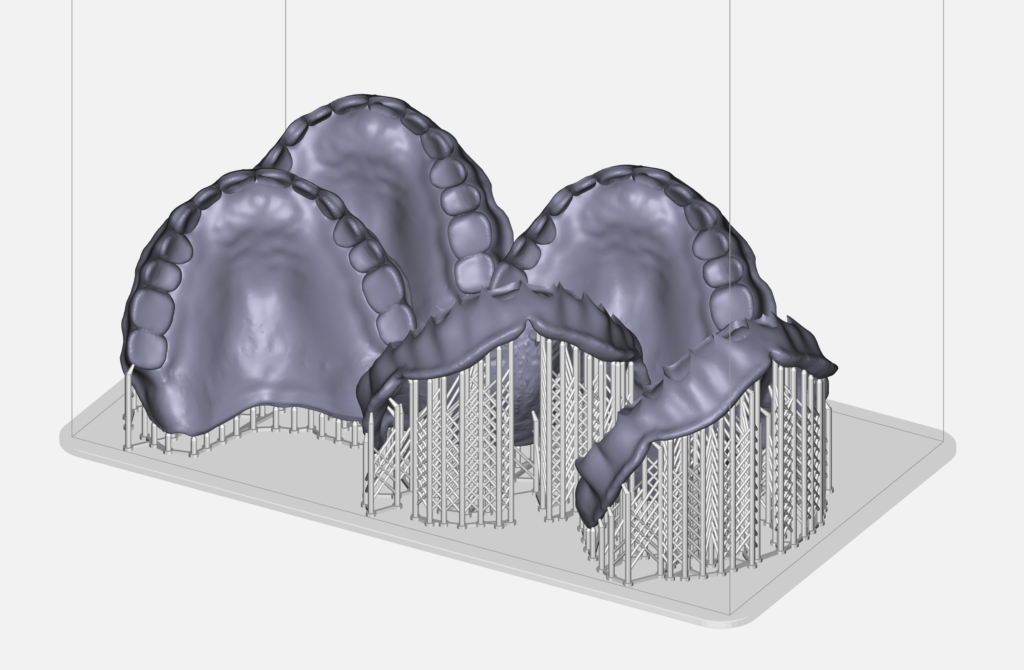
For models that do not have a flush base, such as surgical guides, nightguards, and denture bases, support structures will be required. Because most desktop 3D printers fabricate upside-down, support structures are necessary to achieve good adhesion with the build surface. RayWare can automatically generate supports with the click of a single button. When printing with supports, we recommend that you orient your models between 30- and 60-degrees from the platform.
Care for and Store Resin Properly
Resin and SprintRay Pro function together as a team. If there’s a problem with your printing materials, your printer may not be able to produce consistent, desirable results. Resin care isn’t difficult, but certain rules and processes can help you avoid common mistakes that can lead to print failure. Resin management can be broken down into two core handling phases: resin when it is in the bottle and when it is in the printer’s resin tank.
1. Resin in the Bottle
With the cap secured tightly and when stored at room temperature, resin can be kept in the bottle until its expiration date. The expiration date for SprintRay resin is listed on the back of the bottle. If using a resin that has been on the shelf for a while, make sure to check this date, as the photoinitiators lose efficacy after their expiration date, increasing the likelihood of failure.

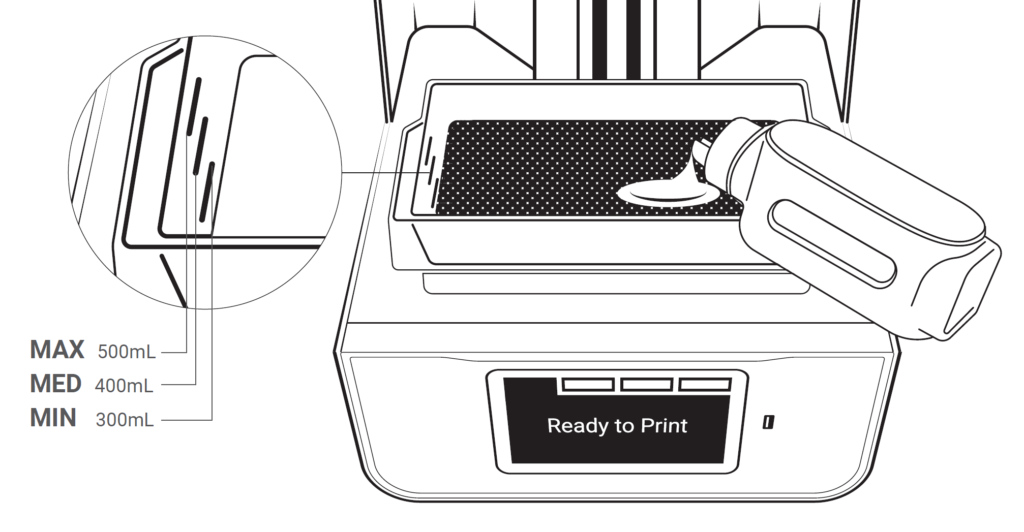
Before pouring resin from the bottle into SprintRay Pro’s resin tank, always shake the bottle for a few moments. Note that particularly viscous resins must be shaken longer to ensure proper mixing. Resin that sits for an extended period is subject to phase separation, which can cause print problems. If pouring a new type of resin into your resin tank, ensure the tank was thoroughly cleaned with isopropyl alcohol and a soft cloth.
When pouring resin back into the bottle from the resin tank, we recommend that you filter it through a fine-mesh strainer. Chunks of partially-cured resin that may have formed in your tank can contaminate the resin in your bottle, leading to print issues down the road. This is an especially important practice when replacing resin into the bottle after a print failure, as there is an increased likelihood of cured particles in the resin tank.
2. Resin in the Tank
Resin exposure most commonly happens when resin sits in your printer’s tank. Because the lid is frequently lifted during the printing process, resin is exposed to light, heat, and air each time the print bed area is accessed. Resins compatible with SprintRay Pro use photoinitiators with peak absorption at 405nm, which is present in most forms of artificial lighting and certainly in direct sunlight.
Even when the print bed is not being accessed, resin should not be left uncovered in SprintRay Pro’s resin tank for more than three days. If left in the tank for more than three days, resin should be strained through a filter before use to remove cured bits. If you’d like to store resin in the tank for longer than 3 days, simply use the provided black tank cover to minimize the risk of contamination.
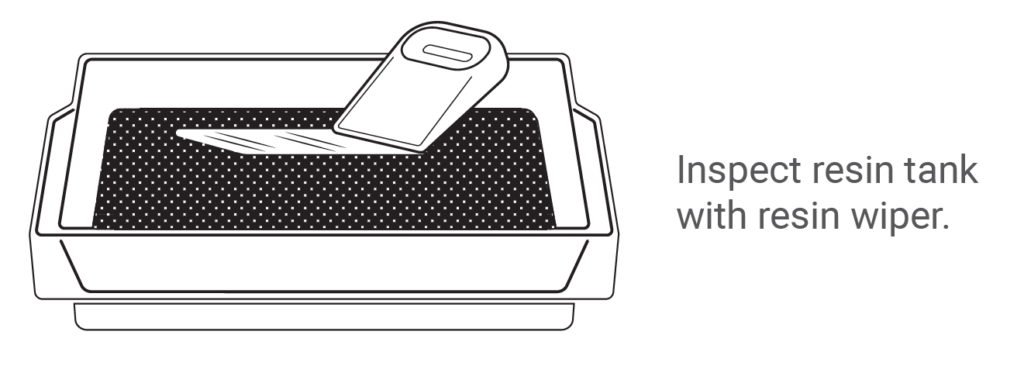
When significant time elapses between print jobs, make sure to use the resin wiper to thoroughly mix the resin in the tank. The resin should have a consistent, homogenous appearance. Just as resin must be shaken in the bottle, so too must it be mixed in the tank after it has been left to sit.
Optimize Your Printing Workspace
Contamination of your printing environment can lead to problems with your final, finished appliances. While potential environmental contaminants are myriad, the rule of thumb is twofold: choose the appropriate environment in which to operate your printer, and keep the environment clean and organized.
1. Choose the Right Environment
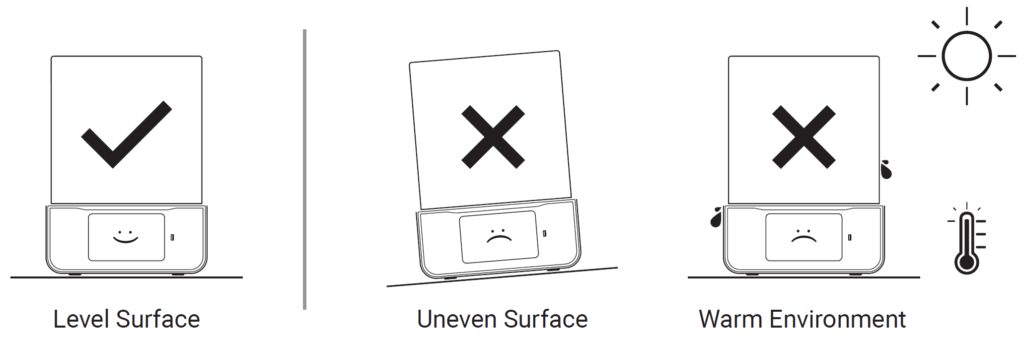
While the leading cause of resin contamination is light, there are a host of other factors that can cause print problems if left unchecked. Ensure that your printer is placed away from windows or other sources of bright natural light. If exposed to direct sunlight for even a very short time per day, the chances of resin contamination are greatly increased.
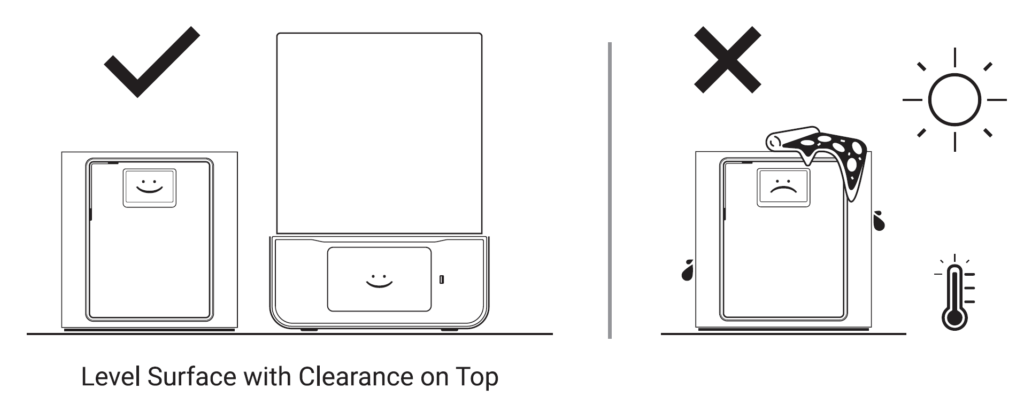
Additionally, high levels of humidity and extreme temperatures can negatively affect your prints. Make sure your printer is in a dry, temperature-controlled room so that proper curing and adhesion can take place. Persistent airflow, such as from a duct or door that is frequently opened, can also cause problems. Place your printer out of the way and keep its environment at a steady temperature, even overnight, between 20-30 degrees Celsius (68-86 Fahrenheit).
Dust and air particles can easily get trapped in liquid resin, so make sure the room you keep your printer in is kept as clean as possible. Small smudges and dust that land on the projector mirror or on the glass below the tank can obscure the light’s optical path, decreasing the likelihood of print success.
2. Keep it Clean and Organized
Because SprintRay printers rely on specifically-metered light, even something as minor as a smudge on the bottom of the resin tank can interrupt the optical path. Just as small amounts of cured composite or adhesive on a curing light can interfere with intraoral curing, contamination anywhere along the optical path of the printer can affect print quality and accuracy. Regularly inspect your tank and the glass below for fingerprints, smudges, or bits of partially-cured resin.
The cleanliness of your post-processing environment is paramount for accurate final parts that have the proper fit and finish. One often overlooked but frequently troublesome sore spot is the wash process. Make sure to use a two-stage IPA system: first rinse your printed parts in a vat of IPA, then let them soak for 10-15 minutes in an agitated concentration of IPA 91% or higher. When the IPA in your wash station begins to appear cloudy, replace it with fresh IPA immediately. If you fail to frequently change out your wash station IPA, your parts can come out tacky and sticky.
A general rule that can drastically reduce misprints is to keep everything as clean and organized as possible. Routinely inspect your printer for anything out of the ordinary, and wipe up any resin spills immediately to prevent them from curing to your Pro. Create specific areas used for performing particular sets of tasks: print prep, washing, post-curing, etc. These help limit contamination, reduce mess, and eliminate mistakes. If you do need to clean your printer, use IPA with a soft cloth and gently wipe out your tank or the glass beneath. IPA helps break down partially-cured resin that has hardened to the printer’s surface, so it may take a few moments for the cleaning agent to take effect.